Understanding Object-Oriented Programming in JavaScript

Self-taught Engineer | Disassembled my first PC at 16, been building ever since | Hardware fundamentals to software and coding| Obsessive learning | Built from scratch to scale
As you write more JavaScript, something starts to bother you.
Functions floating around everywhere. Variables scattered across the file. Data and the logic that handles it living in completely different places.
It works. But it doesn't scale. And it doesn't feel organized.
Object-Oriented Programming — OOP — is a way to fix that. Instead of having data and functions exist separately, you bundle them together into neat, logical units called objects.
And the best part? OOP mirrors how we already think about the real world.
What Does Object-Oriented Programming Actually Mean?
At its core, OOP is about organizing your code around things rather than actions.
Think about how you'd describe a phone in real life. It has properties — a brand, a model, a battery level. And it has behaviors — you can call someone, take a photo, send a message.
In OOP, that phone becomes an object. Its properties are its data. Its behaviors are its methods (functions).
Instead of this:
let phoneBrand = "Samsung";
let phoneBattery = 85;

function chargPhone() {
  phoneBattery = 100;
}
Everything scattered, unconnected.
you write this:
const phone = {
  brand: "Samsung",
  battery: 85,
  charge() {
    this.battery = 100;
  }
};
One self-contained unit. The data and the logic that works on it live together.
That's the mindset shift OOP brings...
The Blueprint Analogy
Here's the clearest way to understand OOP.
Imagine an architect's blueprint for an apartment. The blueprint itself is not an apartment you can't live in it. But it defines everything about how apartments built from it should look -- how many rooms, where the windows go, the layout of the kitchen.
Now imagine a builder takes that blueprint and constructs five apartments. Each one has the same structure, but one is painted beige, another has wooden floors, another is rented to a family of four.
In JavaScript:
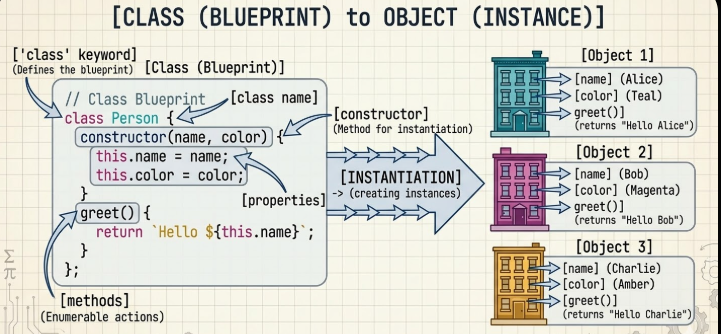
the blueprint = a Class
Each apartment built from it = an Object (also called an instance)
One class. Many objects. Each object shares the same structure but holds its own data.
What Is a Class in JavaScript?
A class is a template for creating objects. You define it once and use it to stamp out as many objects as you need — each with its own data but the same structure and behavior.
Here's a simple class:
class Phone {
  constructor(brand, model) {
    this.brand = brand;
    this.model = model;
  }
}
Let's break it down:
class Phone— declares the class and gives it a nameconstructor— a special method that runs automatically when a new object is createdthis.brand— assigns the value to the object being created
The constructor is basically the setup step. Every time you make a new Phone, it runs immediately and fills in the details.
Creating Objects from a Class
To create an object from a class, you use the new keyword.
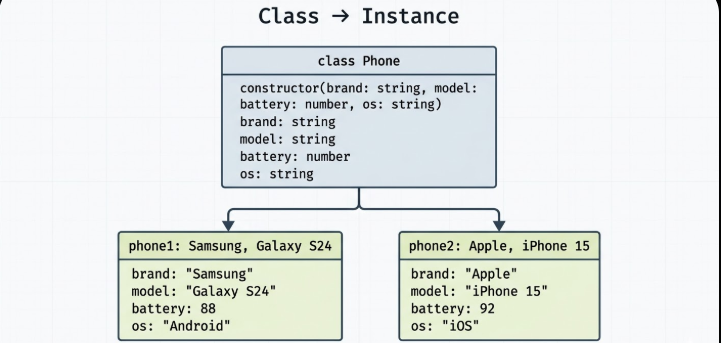
const phone1 = new Phone("Samsung", "Galaxy S24");
const phone2 = new Phone("Apple", "iPhone 15");

console.log(phone1.brand); // Samsung
console.log(phone2.model); // iPhone 15
phone1 and phone2 are two separate objects built from the same Phone blueprint.
They share the same structure — both have a brand and a model — but they hold completely independent data.
This is the power of classes: write the blueprint once, create as many objects as you need.
Methods Inside a Class
Objects aren't just containers for data. They can also do things.
Functions inside a class are called methods. They describe the behavior of the objects created from that class.
class Phone {
  constructor(brand, model, battery) {
    this.brand = brand;
    this.model = model;
    this.battery = battery;
  }

  showStatus() {
    console.log(`\({this.brand} \){this.model} — Battery: ${this.battery}%`);
  }

  charge() {
    this.battery = 100;
    console.log("Fully charged!");
  }
}

const myPhone = new Phone("OnePlus", "Nord 3", 42);

myPhone.showStatus(); // OnePlus Nord 3 — Battery: 42%
myPhone.charge();     // Fully charged!
myPhone.showStatus(); // OnePlus Nord 3 — Battery: 100%
showStatus() and charge() are methods — they live inside the class and have access to the object's data through this.
Every object created from Phone gets these methods automatically.
What Is Encapsulation?
Encapsulation is one of those words that sounds scarier than it is.
All it means is: keep the data and the code that works on it together, in one place.
Look at the Phone class above. The battery level (this.battery) and the method that changes it (charge()) are both inside the same class. The data and its logic are bundled together — that's encapsulation.
The benefit? Other parts of your code don't need to reach in and manually change battery = 100. They just call myPhone.charge() and let the object handle it.
// Without encapsulation — messy
myPhone.battery = 100;

// With encapsulation — clean
myPhone.charge();
The second approach is safer, more intentional, and easier to maintain. If the logic of charging ever changes, you update it in one place — inside the class — and everything using charge() benefits automatically.
Assignment — Try It Yourself
Build a Student class step by step.
// Step 1: Define the class with constructor
class Student {
  constructor(name, age, course) {
    this.name = name;
    this.age = age;
    this.course = course;
  }

  // Step 2: Add a method
  introduce() {
    console.log(
      `Hi, I'm \({this.name}, \){this.age} years old, studying ${this.course}.`
    );
  }

  study() {
    console.log(`${this.name} is hitting the books.`);
  }
}

// Step 3: Create multiple student objects
const student1 = new Student("Aisha", 20, "Web Development");
const student2 = new Student("Dev", 22, "Data Science");
const student3 = new Student("Priya", 19, "UI/UX Design");

// Step 4: Call their methods
student1.introduce(); // Hi, I'm Aisha, 20 years old, studying Web Development.
student2.introduce(); // Hi, I'm Dev, 22 years old, studying Data Science.
student3.study();     // Priya is hitting the books.
After this works, try adding:
A
gradeproperty to the constructorA method called
getResult()that prints pass or fail based on the gradeA fourth student object and call all methods on it
Wrapping Up
OOP doesn't just change how you write code => it changes how you think about it. Instead of scattered variables and functions, you start thinking in terms of things that have properties and can do stuff.
The key ideas from this blog:
OOP bundles data and behavior into objects
A class is a blueprint — define it once, create many objects from it
The constructor sets up an object's initial data when it's created
Methods are functions inside a class that give objects behavior
Encapsulation keeps data and its related logic in one place
This is just the foundation. Once classes feel comfortable, you'll move into inheritance — where one class can extend another — and things start getting genuinely powerful.
But get this down first. Build the Student class. Try the Phone class. Create objects, call methods, see how this points to each individual object.
That hands-on practice is what makes OOP click.


